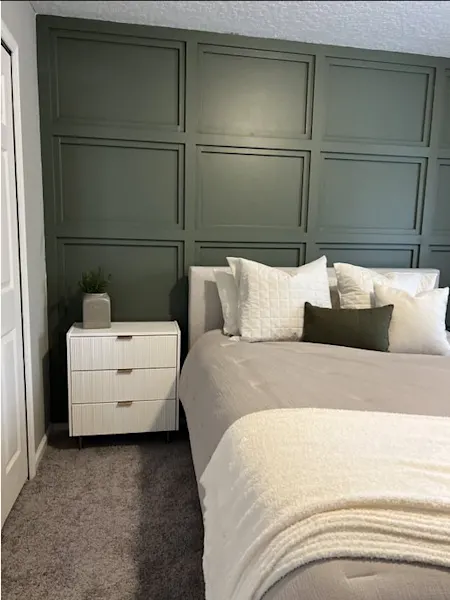
Geometric Accent Wall
April 5, 2023
By: The Finished Space

Need a fun way to add some character to one of your spaces? Accent walls are a great addition! Follow these steps to create a unique, dimensional accent wall that will bring you joy for years to come.

Step 1: Make a Plan
Like any accent wall, the first step is to plan and measure your space and determine what material and tools you will need.
For this project, you will need:
brad nailer and nails
miter saw
Caulk gun
paintable caulk
wood filler
paint of your choice
Painter’s tape
Paint brush & roller
Tape measure
Level
Safety Gear
You can easily determine spacing using this calculator!
After measuring your wall and determining spacing of your boxes, use the measurements to determine how much material to order. For this 8ft W x 11ft High wall, 12 1x3s and 17 1x2s were used.

Step 2: Install and Paint
It might be helpful to paint your wall before installing the trim. Once the trim is up, you will have many more crevices to paint. Painting the solid wall first will give a nice coat before adding trim.

To begin, use your 1x3s and frame the wall. Since this wall has a 3-dimensional aspect, use scrap pieces behind the 1x3s to bump out the trim. This will create that elevation needed for the 3-dimentional look later on in the process. Use the spacing you determined previously to create a sample board. Use this board each time to ensure spacing is even throughout the entire wall! Once you determine your spacing for the grids, install the rest of the vertical and horizontal 1x3s. Continue using scrap wood to bump out the 1x3 trim to achieve the 3-D look.

After you have all your 1x3s installed, you will now use your 1x2s inside of the grids. This will hide the scrap wood used to elevate the 1x3s

And there you have it! A beautiful accent wall to enjoy with just a few simple steps!
Thanks Alex @DIYBYDNAfor sharing!